$ rpm -Uv *.rpm在 CentOS 7 上手工升级 OpenSSL 和 OpenSSH
EpLiar
8月 31, 2021
前言
缘由
笔者单位的生产环境为 CentOS 7,而这个版本的包管理器 yum 所能升级的 OpenSSH 版本最高为 7.4p1,OpenSSL 为 1.0.2k。由于这两个中间件在该版本均有可以被利用的漏洞,因此需要升级,本文详解如何在 CentOS 7 系统下手动升级 OpenSSH 和 OpenSSL。
开始动手升级
|
截至本文撰写时,OpenSSH 最新版本为 8.7p1。但是为了第三章,本章先升级到 8.6p1,第三章在本章完成的环境下升级至 8.7p1,OpenSSL 同理,第二章将先升级至 1.1.1k。 同时,以下所有命令使用 root 用户执行。 |
下载编译所需依赖和 rpm 包
|
如果你的服务器有互联网,请直接 yum install perl gcc pam-devel zlib-devel 以节省生命 |
访问 CentOS Repositories,搜索并下载如下依赖 (包括依赖所需的依赖):
-
pam-devel
-
perl
-
gcc
-
zlib-devel
假定你当前目录下有所有依赖的 rpm 包,执行该命令以一次安装所有包:
下载 OpenSSH 和 OpenSSL
OpenSSL 官网下载页:https://www.openssl.org/source/,在下方找到 /source/old,打开 1.1.1,就可以找到 1.1.1k 版本的 OpenSSL,下载并校验 sha256sum。
$ wget https://www.openssl.org/source/old/1.1.1/openssl-1.1.1k.tar.gz
$ curl https://www.openssl.org/source/old/1.1.1/openssl-1.1.1k.tar.gz.sha256
892a0875b9872acd04a9fde79b1f943075d5ea162415de3047c327df33fbaee5
$ sha256sum openssl-1.1.1k.tar.gz
892a0875b9872acd04a9fde79b1f943075d5ea162415de3047c327df33fbaee5  openssl-1.1.1k.tar.gz
OpenSSH 官网:https://www.openssh.com/,找到 For other systems 点击任意一个,在新页面的 HTTP 列表中打开任意一个就可以看到各版本的 OpenSSH 源码和 PGP asc。
# 首先下载并导入 OpenSSH 公钥
$ wget https://ftp.openbsd.org/pub/OpenBSD/OpenSSH/RELEASE_KEY.asc
$ gpg --import RELEASE_KEY.asc

# 笔者在此处使用的 OpenBSD 源
$ wget https://cdn.openbsd.org/pub/OpenBSD/OpenSSH/portable/openssh-8.6p1.tar.gz
$ wget https://cdn.openbsd.org/pub/OpenBSD/OpenSSH/portable/openssh-8.6p1.tar.gz.asc

# 验证文件
$ gpg --verify openssh-8.6p1.tar.gz.asc|
如果你没有比较科学的上网方式,务必在下载完成后校验哈希值。 |
升级 OpenSSL
解压并进入 OpenSSL 1.1.1k 目录,生成 Makefile:
$ tar xzf openssl-1.1.1k.tar.gz
$ cd openssl-1.1.1k
$ ./config shared --prefix=/usr/local/openssl
Operating system: x86_64-whatever-linux2
Configuring OpenSSL version 1.1.1k (0x101010bfL) for linux-x86_64
Using os-specific seed configuration
Creating configdata.pm
Creating Makefile

**********************************************************************
***                                                                ***
***   OpenSSL has been successfully configured                     ***
***                                                                ***
***   If you encounter a problem while building, please open an    ***
***   issue on GitHub <https://github.com/openssl/openssl/issues>  ***
***   and include the output from the following command:           ***
***                                                                ***
***       perl configdata.pm --dump                                ***
***                                                                ***
***   (If you are new to OpenSSL, you might want to consult the    ***
***   'Troubleshooting' section in the INSTALL file first)         ***
***                                                                ***
**********************************************************************|
将 OpenSSL 放置在 你可能会问为什么不用 Configure 而使用 config 去生成 Makefile,这是因为当不需要跨平台编译 (即默认编译当前操作系统平台) 时,使用 config 足矣[2]。 |
重命名当前版本的 OpenSSL 可执行文件,这一步保证操作失误还能补救:
$ mv /usr/bin/openssl /usr/bin/openssl-bak编译并安装,编译过程会比较久:
$ make && make install校验 make install 这一步有没有异常,非 0 即异常:
$ echo $?
0
将编译好的可执行文件软链到 /usr/bin,同时将 OpenSSL 目录软链到 /usr/include:
$ ln -s /usr/local/openssl/bin/openssl /usr/bin/openssl
$ ln -s /usr/local/openssl/include/openssl /usr/include/openssl
这时候虽然已经升级了二进制版本,但执行 openssl version 会提示加载库时错误,需要加载新配置:
$ echo "/usr/local/openssl/lib" >> /etc/ld.so.conf
$ ldconfig
然后校验一下 OpenSSL 是否能正常启动,并生成一个 128 位的质数看看:
$ openssl version
OpenSSL 1.1.1k  25 Mar 2021
$ openssl prime -generate -bits 128
318483516442811350585654731373260030319
升级 OpenSSH
|
升级 OpenSSH 过程中需要非常稳定的网络质量。如果不确定网络是否稳定,或者你的服务器没有补救措施 (包括但不限于自动备份、VNC、去机房等),请不要跳过安装 Telnet Server 这一步。 |
安装 Telnet Server
访问 https://pkgs.org/download/telnet-server 下载适用于你系统架构的 Telnet Server首先安装并启用 Telnet-Server,安装启用并同时停止防火墙:
$ rpm -U *.rpm
$ systemctl start telnet.socket
$ systemctl stop firewalld
然后尝试从局域网下其他机器登录,或者在你当前的终端新开一个 Shell 进行登录:
$ telnet YOUR_HOST关闭 SE Linux
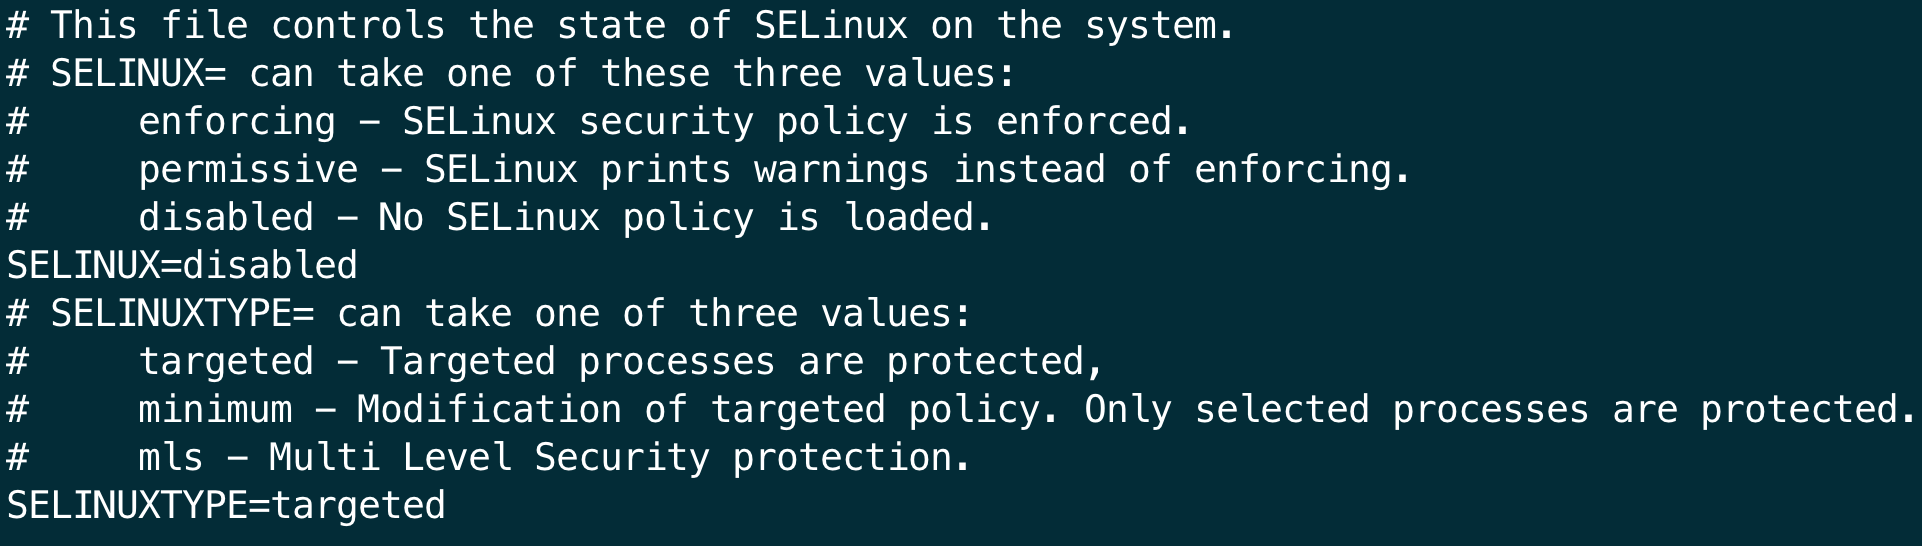
安装前需要关闭 SE Linux,如果不关闭会在 sshd 启动的时候报 Starting sshd:/usr/sbin/sshd: error while loading shared libraries: libcrypto.so.1.1: cannot enable executable stack as shared object requires: Permission denied。检查开启状态:
$ getenforce
Enforcing
Enforcing 为开启,Disabled 为关闭。编辑 /etc/selinux/config,将 SELINUX=enforcing 改为 SELINUX=disabled
卸载旧的包
先查询当前已安装的包:
$ rpm -qa | grep openssh
openssh-server-7.4p1-21.el7.x86_64
openssh-clients-7.4p1-21.el7.x86_64
openssh-7.4p1-21.el7.x86_64
随后把查出来的包卸载:
$ rpm -e --nodeps openssh-server-7.4p1-21.el7.x86_64 openssh-clients-7.4p1-21.el7.x86_64 openssh-7.4p1-21.el7.x86_64|
|
验证一下是否还有 ssh, sshd 等文件:
$ ssh -V
-bash: ssh: 未找到命令
$ sshd
-bash: sshd: 未找到命令
编译 OpenSSH
$ cd openssh-8.6p1
$ ./configure --prefix=/usr --sysconfdir=/etc/ssh --with-ssl-dir=/usr/local/openssl --with-pam --with-md5-passwords
$ make
安装 OpenSSH 文件
在安装前,需要先修改 /etc/ssh 下私钥的权限:
$ chmod 600 /etc/ssh/ssh_host_rsa_key
$ chmod 600 /etc/ssh/ssh_host_ecdsa_key
$ chmod 600 /etc/ssh/ssh_host_ed25519_key
不改私钥权限会在 make install 时提示 dangerous,你要是想看看也可以。
安装:
$ make install
/bin/mkdir -p /usr/bin
/bin/mkdir -p /usr/sbin
/bin/mkdir -p /usr/share/man/man1
/bin/mkdir -p /usr/share/man/man5
/bin/mkdir -p /usr/share/man/man8
/bin/mkdir -p /usr/libexec
/bin/mkdir -p -m 0755 /var/empty
/bin/install -c -m 0755 -s ssh /usr/bin/ssh
/bin/install -c -m 0755 -s scp /usr/bin/scp
/bin/install -c -m 0755 -s ssh-add /usr/bin/ssh-add
/bin/install -c -m 0755 -s ssh-agent /usr/bin/ssh-agent
/bin/install -c -m 0755 -s ssh-keygen /usr/bin/ssh-keygen
/bin/install -c -m 0755 -s ssh-keyscan /usr/bin/ssh-keyscan
/bin/install -c -m 0755 -s sshd /usr/sbin/sshd
/bin/install -c -m 4711 -s ssh-keysign /usr/libexec/ssh-keysign
/bin/install -c -m 0755 -s ssh-pkcs11-helper /usr/libexec/ssh-pkcs11-helper
/bin/install -c -m 0755 -s ssh-sk-helper /usr/libexec/ssh-sk-helper
/bin/install -c -m 0755 -s sftp /usr/bin/sftp
/bin/install -c -m 0755 -s sftp-server /usr/libexec/sftp-server
/bin/install -c -m 644 ssh.1.out /usr/share/man/man1/ssh.1
/bin/install -c -m 644 scp.1.out /usr/share/man/man1/scp.1
/bin/install -c -m 644 ssh-add.1.out /usr/share/man/man1/ssh-add.1
/bin/install -c -m 644 ssh-agent.1.out /usr/share/man/man1/ssh-agent.1
/bin/install -c -m 644 ssh-keygen.1.out /usr/share/man/man1/ssh-keygen.1
/bin/install -c -m 644 ssh-keyscan.1.out /usr/share/man/man1/ssh-keyscan.1
/bin/install -c -m 644 moduli.5.out /usr/share/man/man5/moduli.5
/bin/install -c -m 644 sshd_config.5.out /usr/share/man/man5/sshd_config.5
/bin/install -c -m 644 ssh_config.5.out /usr/share/man/man5/ssh_config.5
/bin/install -c -m 644 sshd.8.out /usr/share/man/man8/sshd.8
/bin/install -c -m 644 sftp.1.out /usr/share/man/man1/sftp.1
/bin/install -c -m 644 sftp-server.8.out /usr/share/man/man8/sftp-server.8
/bin/install -c -m 644 ssh-keysign.8.out /usr/share/man/man8/ssh-keysign.8
/bin/install -c -m 644 ssh-pkcs11-helper.8.out /usr/share/man/man8/ssh-pkcs11-helper.8
/bin/install -c -m 644 ssh-sk-helper.8.out /usr/share/man/man8/ssh-sk-helper.8
/bin/mkdir -p /etc/ssh
ssh-keygen: generating new host keys: DSA
/usr/sbin/sshd -t -f /etc/ssh/sshd_config
配置并启动 OpenSSH
安装文件到指定目录:
$ install -m755 contrib/ssh-copy-id /usr/bin
$ install -m644 contrib/ssh-copy-id.1 /usr/share/man/man1
$ install -m755 -d /usr/share/doc/openssh-8.6p1
$ install -m644 INSTALL LICENCE OVERVIEW README* /usr/share/doc/openssh-8.6p1
编辑 /etc/ssh/sshd_config,将注释掉的 UsePAM no 取消注释并改为 yes。随后再根据你的实际情况,修改剩余内容。笔者强调,PermitRootLogin 选项默认是 prohibit-password,这就意味着 root 用户只能通过密钥进行登录。如果你需要远程登录 root 账户并使用密码认证,请取消注释并修改 prohibit-password 为 yes。
随后设置 init.d (你也可以无视这一步使用更前沿的 SystemD):
$ cp -p contrib/redhat/sshd.init /etc/init.d/sshd
$ chmod +x /etc/init.d/sshd
$ chkconfig --add sshd
检查一下 sshd 服务的档位:
$ chkconfig --list sshd
sshd           	0:关	1:关	2:开	3:开	4:开	5:开	6:关
在 chkconfig 的 0-6 档位中,6 是重启机器,因此如果需要让 sshd 开机自启,需要指定档位:
$ chkconfig --level 6 sshd on启动 sshd:
$ systemctl start sshd
$ systemctl status sshd
● sshd.service - SYSV: OpenSSH server daemon
   Loaded: loaded (/etc/rc.d/init.d/sshd; bad; vendor preset: enabled)
   Active: active (running) since 二 2021-08-31 21:21:16 CST; 6s ago
     Docs: man:systemd-sysv-generator(8)
  Process: 31069 ExecStart=/etc/rc.d/init.d/sshd start (code=exited, status=0/SUCCESS)
 Main PID: 31077 (sshd)
   CGroup: /system.slice/sshd.service
           └─31077 sshd: /usr/sbin/sshd [listener] 0 of 10-100 startups

8月 31 21:21:16 bogon systemd[1]: Starting SYSV: OpenSSH server daemon...
8月 31 21:21:16 bogon sshd[31077]: Server listening on 0.0.0.0 port 22.
8月 31 21:21:16 bogon sshd[31077]: Server listening on :: port 22.
8月 31 21:21:16 bogon systemd[1]: Started SYSV: OpenSSH server daemon.
配置 PAM
PAM 的介绍可以看看这个链接:https://www.cyberark.com/zh-hans/what-is/privileged-access-management/
笔者之前手动升级 OpenSSH 时,忘记配置 PAM,导致 ulimit 一直是 4096,Elastic 就无法启动,需要在登录后再 su 来曲线救国,非常不优雅。但是如果 PAM 配置不正确,会导致密码正确也无法登录。
复制 sshd.pam 到 /etc/pam.d 下并重命名为 sshd:
$ cp -p contrib/redhat/sshd.pam /etc/pam.d/sshd之后修改 /etc/pam.d/sshd 的内容,这里可以抄作业:
/etc/pam.d/sshd
auth       required     pam_sepermit.so
auth       include      password-auth
account    required     pam_nologin.so
account    include      password-auth
password   include      password-auth

session    required     pam_selinux.so close
session    required     pam_loginuid.so

session    required     pam_selinux.so open env_params
session    optional     pam_keyinit.so force revoke
session    include      password-auth
随后重启 sshd:
$ systemctl restart sshd验证 OpenSSH
首先当然是直接执行文件:
$ ssh -V
OpenSSH_8.6p1, OpenSSL 1.1.1k  25 Mar 2021
随后登录 127.0.0.1 并打印日志,观察本地和远端的版本:
$ ssh 127.0.0.1 -v
...
debug1: Local version string SSH-2.0-OpenSSH_8.6
debug1: Remote protocol version 2.0, remote software version OpenSSH_8.6
...
然后从第三台机器登录,sftp 等,查看有无问题:
$ ssh 192.168.50.22
([email protected]) Password:
Last login: Tue Aug 31 21:37:54 2021 from 127.0.0.1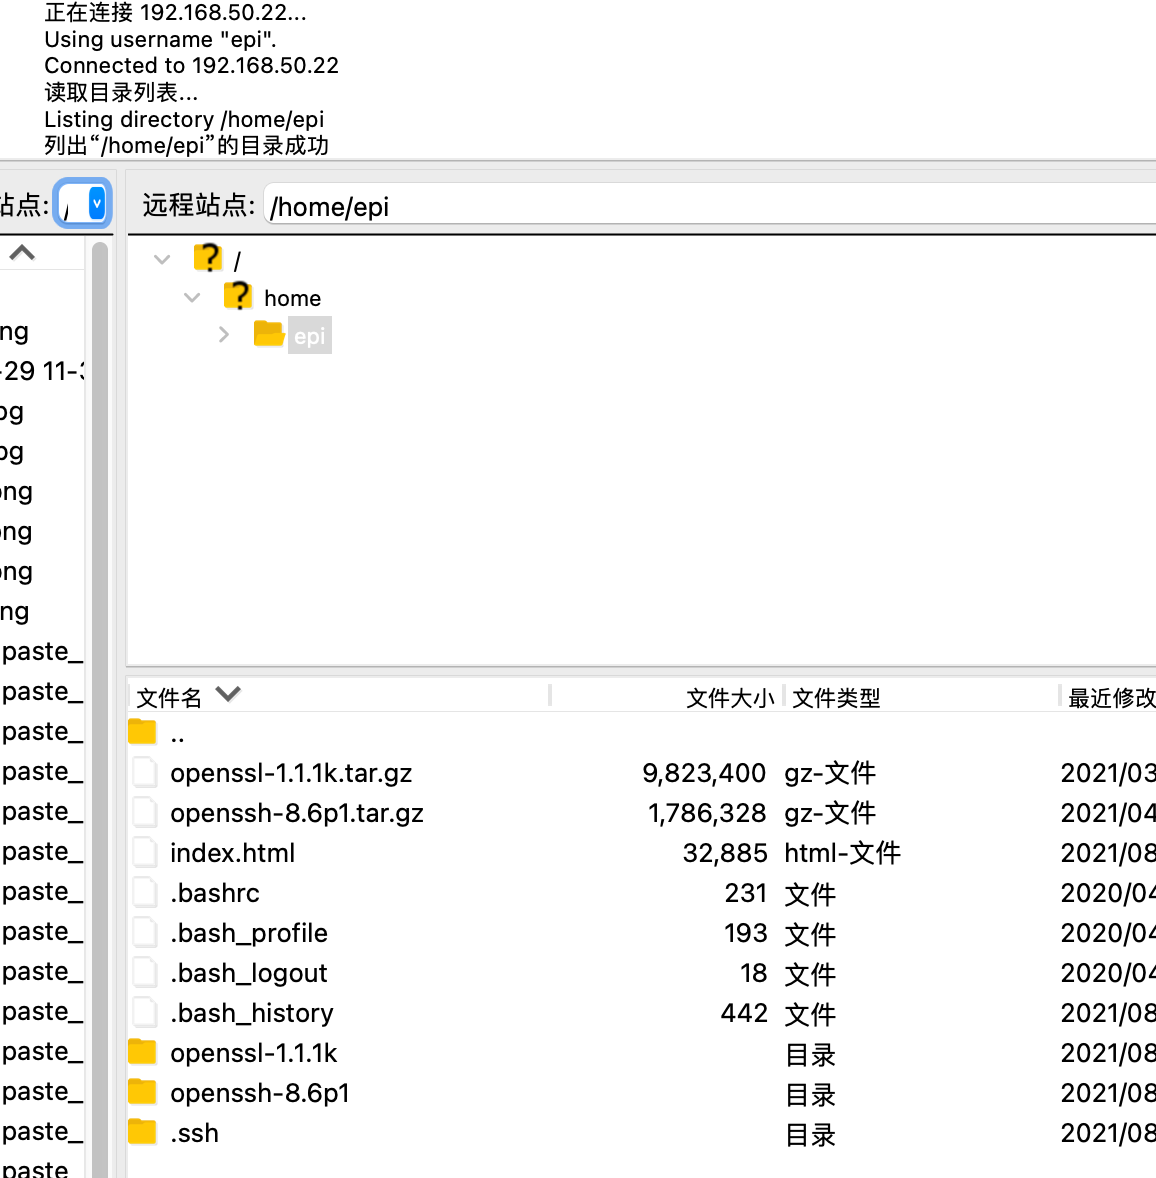
清理
$ cd ~
$ rm -rf openss*
$ rm /usr/bin/openssl-bak

# 如果你有安装 telnet-serner
$ yum remove telnet-server
从手工升级的方式升级
显然,我们无法用第二章的步骤升级当前环境的 OpenSSL 和 OpenSSH,因此在本章说明在手工编译安装的基础上升级。
升级新 OpenSSL (1.1.1)
生成 OpenSSL Makefile 的方式请查阅升级 OpenSSL。由于之前是手工编译安装,因此这一步会省去软链接文件和添加库,但在 make install 之前需要删除旧版本的文件:
$ rm -rf /usr/local/openssl
$ make install
$ openssl version
OpenSSL 1.1.1l  24 Aug 2021
升级新 OpenSSL (3.0.0)
在九月七号 OpenSSL 3.0.0 正式发布,实操时候发现还是有需要注意的点,不能完全对着 1.1.1 的方式去执行。秉着对所写的文章负责,于是加了这一小章。
3.0.0 的 OpenSSL 在生成 Makefile 和编译过程中需要 Perl 的如下两个依赖,请自行 yum install 或 rpm -U (包括依赖所需的依赖,本文不做赘述):
-
perl-IPC-Cmd
-
perl-Data-Dumper
-
perl-Test-Simple (
make test会用到)
编译并安装:
$ make
$ rm -rf /usr/local/openssl
$ make install
由于 lib 目录和 1.1.1 版本不同,所以要重新修改一下库的路径
$ echo "/usr/local/openssl/lib64" >> /etc/ld.so.conf
$ ldconfig
$ openssl version
OpenSSL 3.0.0 7 sep 2021 (Library: OpenSSL 3.0.0 7 sep 2021)
升级新 OpenSSH
生成 OpenSSH Makefile 的方式请查阅 编译 OpenSSH,在手工升级的基础上安装前不需要修改私钥权限:
$ make && make install其实在这一步就可以 ssh -V 了,不过得把新的文件 install 一下:
$ rm -rf /usr/share/doc/openssh-8.6p1
$ install -m755 contrib/ssh-copy-id /usr/bin
$ install -m644 contrib/ssh-copy-id.1 /usr/share/man/man1
$ install -m755 -d /usr/share/doc/openssh-8.7p1
$ install -m644 INSTALL LICENCE OVERVIEW README* /usr/share/doc/openssh-8.7p1
甚至连 init.d 文件都不需要更新:
$ diff openssh-8.6p1/contrib/redhat/sshd.init openssh-8.7p1/contrib/redhat/sshd.init | wc -l
0
重启你的 sshd:
$ systemctl restart sshd
$ ssh -V
OpenSSH_8.7p1, OpenSSL 1.1.1l  24 Aug 2021
如果沿用上一小章编译的 OpenSSL 3.0.0,结果会是这样:
$ ssh -V
OpenSSH_8.7p1, OpenSSL 3.0.0 7 sep 2021
使用原生 systemd
经过第二章后,sshd 已经可以作为守护进程启动了:
$ systemctl status sshd
● sshd.service - SYSV: OpenSSH server daemon
   Loaded: loaded (/etc/rc.d/init.d/sshd; bad; vendor preset: enabled)
   Active: active (running) since Wed 2021-09-01 21:26:07 CST; 4min 40s ago
     Docs: man:systemd-sysv-generator(8)
  Process: 1001 ExecStart=/etc/rc.d/init.d/sshd start (code=exited, status=0/SUCCESS)
 Main PID: 1030 (sshd)
   CGroup: /system.slice/sshd.service
           └─1030 sshd: /usr/sbin/sshd [listener] 0 of 10-100 startups

9月 01 21:26:07 bogon systemd[1]: Starting SYSV: OpenSSH server daemon...
9月 01 21:26:07 bogon sshd[1001]: Starting sshd:[  确定  ]
9月 01 21:26:07 bogon systemd[1]: Can't open PID file /var/run/sshd.pid (yet?) after start: No...tory
9月 01 21:26:07 bogon sshd[1030]: Server listening on 0.0.0.0 port 22.
9月 01 21:26:07 bogon sshd[1030]: Server listening on :: port 22.
9月 01 21:26:07 bogon systemd[1]: Started SYSV: OpenSSH server daemon.
但是这个并不是原生的 SystemD 文件,它是由 init.d (SystemV) 过来的。相较于 SystemV,SystemD 拥有启动时间短等一系列优点,在此不做赘述。
在写这一章之前,我 Google 过一番,有篇文章[3]里写 chkconfig 添加的 sshd 运行的时候会在 /run/systemd/generator.late/ 下生成 service 文件,拷贝到 /usr/lib/systemd/system/ 就好。当我对着这个操作后,执行 systemctl enable 发现无法添加到 multi-user.target.wants 里,导致重启系统后 sshd 没有自启,于是我觉定寻找更科学的解决方案。
去 Arch Linux 那看样例
众所周知,Arch Linux 一直拥有着最前沿的软件包,OpenSSH 和 OpenSSL 也不例外,笔者 Arch Linux 上的 OpenSSH 在撰写本文之前就已经滚到了从 OpenSSL 为 1.1.1l 为依赖编译的 OpenSSH 了。既然版本都一样,那么不妨看看,OpenSSH 打包者给我们提供的 SystemD 文件样例:
$ systemctl cat sshd
# /usr/lib/systemd/system/sshd.service
[Unit]
Description=OpenSSH Daemon
Wants=sshdgenkeys.service
After=sshdgenkeys.service
After=network.target

[Service]
ExecStart=/usr/bin/sshd -D
ExecReload=/bin/kill -HUP $MAINPID
KillMode=process
Restart=always

[Install]
WantedBy=multi-user.target
看起来也比较简单,依赖 sshdgenkeys.service,在 sshdgenkeys.service 和 network.target 运行后才运行。network.target 比较好理解,你服务器都没网我 ssh 能用吗?那再看看 sshdgenkeys.service?
$ systemctl cat sshdgenkeys
# /usr/lib/systemd/system/sshdgenkeys.service
[Unit]
Description=SSH Key Generation
ConditionPathExists=|!/etc/ssh/ssh_host_dsa_key
ConditionPathExists=|!/etc/ssh/ssh_host_dsa_key.pub
ConditionPathExists=|!/etc/ssh/ssh_host_ecdsa_key
ConditionPathExists=|!/etc/ssh/ssh_host_ecdsa_key.pub
ConditionPathExists=|!/etc/ssh/ssh_host_ed25519_key
ConditionPathExists=|!/etc/ssh/ssh_host_ed25519_key.pub
ConditionPathExists=|!/etc/ssh/ssh_host_rsa_key
ConditionPathExists=|!/etc/ssh/ssh_host_rsa_key.pub

[Service]
ExecStart=/usr/bin/ssh-keygen -A
Type=oneshot
RemainAfterExit=yes
Type=oneshot 可以得知 sshdgenkeys.service 需要运行结束才能走其他 After 它的服务 (sshd),还有这一坨的 ConditionPathExists 单看字面意思就是检测文件 / 路径是否存在。ssh-keygen 通常用来生成 ssh 密钥对,那 -A 选项干嘛用的?
$ man ssh-keygen
...
     -A      For each of the key types (rsa, dsa, ecdsa and ed25519) for which
             host keys do not exist, generate the host keys with the default
             key file path, an empty passphrase, default bits for the key
             type, and default comment.  If -f has also been specified, its
             argument is used as a prefix to the default path for the
             resulting host key files.  This is used by /etc/rc to generate
             new host keys.
...这下明白了,ssh-keygen -A 是用来生成 host key 的,那么 ConditionPathExists 也就是检测是否存在 host keys 了。
写入适合自己的 service
那照抄 Arch 的行不行?
$ which ssh-keygen
/usr/bin/ssh-keygen
$ which sshd
/usr/sbin/sshd
因为路径不同,因此我们需要在 Arch 打包者提供的 service 上改改,那么因地制宜后的 sshd.service 和 sshgenkeys.service 就长这个样子:
sshd.service
[Unit]
Description=OpenSSH Daemon
Wants=sshdgenkeys.service
After=sshdgenkeys.service
After=network.target

[Service]
ExecStart=/usr/sbin/sshd -D
ExecReload=/bin/kill -HUP $MAINPID
KillMode=process
Restart=always

[Install]
WantedBy=multi-user.target
sshgenkeys.service
[Unit]
Description=SSH Key Generation
ConditionPathExists=|!/etc/ssh/ssh_host_dsa_key
ConditionPathExists=|!/etc/ssh/ssh_host_dsa_key.pub
ConditionPathExists=|!/etc/ssh/ssh_host_ecdsa_key
ConditionPathExists=|!/etc/ssh/ssh_host_ecdsa_key.pub
ConditionPathExists=|!/etc/ssh/ssh_host_ed25519_key
ConditionPathExists=|!/etc/ssh/ssh_host_ed25519_key.pub
ConditionPathExists=|!/etc/ssh/ssh_host_rsa_key
ConditionPathExists=|!/etc/ssh/ssh_host_rsa_key.pub

[Service]
ExecStart=/usr/bin/ssh-keygen -A
Type=oneshot
RemainAfterExit=yes|
你也可以不叫它 sshgenkeys,Fedora 那边叫做 sshd-keygen,Debian 甚至把这一步合到了 sshd.service 里。 |
然后写入到 /usr/lib/systemd/system/ 下:
$ vim /usr/lib/systemd/system/sshd.service
$ vim /usr/lib/systemd/system/sshgenkeys.service
移除 SystemV,重新加载守护进程并重启 sshd:
$ chkconfig --del sshd
$ systemctl daemon-reload
$ systemctl restart sshd
$ systemctl status sshd
● sshd.service - OpenSSH Daemon
   Loaded: loaded (/usr/lib/systemd/system/sshd.service; disabled; vendor preset: enabled)
   Active: active (running) since 三 2021-09-01 22:18:05 CST; 4s ago
 Main PID: 1410 (sshd)
   CGroup: /system.slice/sshd.service
           └─1410 sshd: /usr/sbin/sshd -D [listener] 0 of 10-100 startups

9月 01 22:18:05 bogon systemd[1]: Stopped OpenSSH Daemon.
9月 01 22:18:05 bogon systemd[1]: Started OpenSSH Daemon.
9月 01 22:18:05 bogon sshd[1410]: Server listening on 0.0.0.0 port 22.
9月 01 22:18:05 bogon sshd[1410]: Server listening on :: port 22.
这时候要使开机自启,就要使用 systemctl 的方式了:
$ systemctl enable sshd
Created symlink from /etc/systemd/system/multi-user.target.wants/sshd.service to /usr/lib/systemd/system/sshd.service.
为什么不去 Fedora 抄作业?
我在撰写 SystemD 这部分时参考过 和 CentOS 同源的 Fedora,不得不说由于还在维护,Fedora 上最新的 OpenSSH 是 8.6p1。但我并没有使用 Fedora 的 SystemD,原因是相较于 Arch Linux 更繁琐,且繁琐的这部分没有必要。在这里列举一下 Arch 和 Fedora 上 sshd 的 SystemD 文件:
Arch Linux
$ ls | grep ssh
sshd.service
sshdgenkeys.service
Fedora
$ ls | grep sshd
[email protected]
sshd-keygen.target
sshd.service
[email protected]
sshd.socket
以 [email protected] 内容做个说明为什么不推荐抄 Fedora 的作业:
$ cat sshd-keygen\@.service
[Unit]
Description=OpenSSH %i Server Key Generation
ConditionFileNotEmpty=|!/etc/ssh/ssh_host_%i_key

[Service]
Type=oneshot
EnvironmentFile=-/etc/sysconfig/sshd
ExecStart=/usr/libexec/openssh/sshd-keygen %i

[Install]
WantedBy=sshd-keygen.target
Fedora 这里的可执行文件叫做 sshd-keygen,然而编译后并没有这个文件:
$ find . -executable -type f | grep ssh
./contrib/hpux/sshd.rc
./contrib/redhat/sshd.init
./contrib/redhat/sshd.init.old
./opensshd.init.in
./regress/ssh2putty.sh
./regress/unittests/sshkey/mktestdata.sh
./regress/unittests/sshsig/mktestdata.sh
./ssh
./sshd
./ssh-add
./ssh-keygen
./ssh-keyscan
./ssh-keysign
./ssh-pkcs11-helper
./ssh-agent
./ssh-sk-helper
man 也得不出 sshd-keygen 是个什么结果:
$ man sshd-keygen
没有 sshd-keygen 的手册页条目
然后我试着 cat 了 /usr/libexec/openssh/sshd-keygen,然后把重点标注了一下:
$ cat sshd-keygen
#!/usr/bin/bash

# Create the host keys for the OpenSSH server.
KEYTYPE=$1
case $KEYTYPE in (1)
  "dsa") ;& # disabled in FIPS
  "ed25519")
    FIPS=/proc/sys/crypto/fips_enabled
    if [[ -r "$FIPS" && $(cat $FIPS) == "1" ]]; then
      exit 0
    fi ;;
  "rsa") ;; # always ok
  "ecdsa") ;;
  *) # wrong argument
    exit 12 ;;
esac
KEY=/etc/ssh/ssh_host_${KEYTYPE}_key

KEYGEN=/usr/bin/ssh-keygen (2)
if [[ ! -x $KEYGEN ]]; then
  exit 13
fi

# remove old keys
rm -f $KEY{,.pub}

# create new keys
if ! $KEYGEN -q -t $KEYTYPE -f $KEY -C '' -N '' >&/dev/null; then
  exit 1
fi

# sanitize permissions
/usr/bin/chgrp ssh_keys $KEY
/usr/bin/chmod 640 $KEY
/usr/bin/chmod 644 $KEY.pub
if [[ -x /usr/sbin/restorecon ]]; then
  /usr/sbin/restorecon $KEY{,.pub}
fi

exit 0| 1 | 检测传参 |
| 2 | 其实就还是用的 ssh-keygen |
屑,一轮复杂下来最后用的 ssh-keygen 写了个脚本,还是抄 Arch 的作业吧。
后记
加快编译速度
make 有个 -j 选项,允许同时存在多个任务,但在此之前先看看你的服务器有几个核心 (你如果知道的话可以跳过查看核心的步骤):
$ cat /proc/cpuinfo | grep cores
cpu cores : 3
cpu cores : 3
cpu cores : 3
然后就可以带上 -j 选项和核心数量:
$ make -j3喂不要随便 make -j8 啊
UsePAM no 会怎样?
|
笔者在直接关闭 UsePAM 的时候遇到无法使用密码登录的问题,因此不要直接关闭 UsePAM 后断开当前 ssh 连接,除非你有密钥登录等保障手段,否则你有可能会无法登录服务器。 |
其实你会在生成 OpenSSH Makefile 的时候看到这段话:
PAM is enabled. You may need to install a PAM control file for sshd, otherwise password authentication may fail. Example PAM control files can be found in the contrib/ subdirectory
— OpenSSH configure
翻译过来就是 PAM 已经启用了,你需要为 sshd 安装 PAM 控制文件,否则密码验证将失败。PAM 样例在 contrib 的子目录下。
首先我们把 limits 修改一下:
$ cat /etc/security/limits.conf | grep -E "soft|hard"
#        - "soft" for enforcing the soft limits
#        - "hard" for enforcing hard limits
#*               soft    core            0
#*               hard    rss             10000
#@student        hard    nproc           20
#@faculty        soft    nproc           20
#@faculty        hard    nproc           50
#ftp             hard    nproc           0
*   soft  nofile    65535
*   hard  nofile    65535
修改 /etc/ssh/sshd_config 的 UsePAM 后,重启 sshd,待重启系统后再查看一下 limits:
$ systemctl restart sshd
$ sync && systemctl reboot

# 重启登录后,查看 ulimit
$ ulimit -n
1024
随后 su 一下再看看?
$ su -l epi
密码:
上一次登录:三 9月  1 13:30:50 CST 2021从 192.168.50.120pts/1 上
$ ulimit -n
65535
编译的时候不带 PAM 呢?试试看。
$ make clean
$ ./configure --prefix=/usr --sysconfdir=/etc/ssh --with-ssl-dir=/usr/local/openssl --with-md5-passwords
$ make && make install
...
/etc/ssh/sshd_config line 82: Unsupported option UsePAM|
至于为什么需要 但是为了在需要的时候不用再编译一遍,在 configure 时就告诉它要编译这部分。 |
这时候你就得去 /etc/ssh/sshd_config 里注释掉 UsePAM,否则重启后 systemctl status sshd 会有一行报错:
$ sudo systemctl status sshd -l
● sshd.service - SYSV: OpenSSH server daemon
   Loaded: loaded (/etc/rc.d/init.d/sshd; bad; vendor preset: enabled)
   Active: active (running) since Wed 2021-09-01 13:40:03 CST; 10s ago
     Docs: man:systemd-sysv-generator(8)
  Process: 13168 ExecStop=/etc/rc.d/init.d/sshd stop (code=exited, status=0/SUCCESS)
  Process: 13174 ExecStart=/etc/rc.d/init.d/sshd start (code=exited, status=0/SUCCESS)
 Main PID: 13182 (sshd)
   CGroup: /system.slice/sshd.service
           └─13182 sshd: /usr/sbin/sshd [listener] 0 of 10-100 startup

9月 01 13:40:03 ep21 systemd[1]: Stopped SYSV: OpenSSH server daemon.
9月 01 13:40:03 ep21 systemd[1]: Starting SYSV: OpenSSH server daemon...
9月 01 13:40:03 ep21 sshd[13174]: Starting sshd:/etc/ssh/sshd_config line 82: Unsupported option UsePAM
然后登录,查看 ulimit:
$ ulimit -n
1024
在 limits.conf 的手册里,有这么一句话:
The pam_limits.so module applies ulimit limits, nice priority and number of simultaneous login sessions limit to user login sessions. This description of the configuration file syntax applies to the /etc/security/limits.conf file and \*.conf files in the /etc/security/limits.d directory.
pam_limits.so 模块将 ulimit 限制、良好优先级和同时登录会话数限制应用于用户登录会话。此配置文件语法说明适用于 /etc/security/limits.d 目录中的 /etc/security/limits.conf 文件和 \*.conf 文件。
— man limits.conf
因此,PAM 会影响 limits.conf,切记不要关掉 UsePAM。
单独升级 OpenSSH?
你完全可以在不升级 OpenSSL 的情况下升级 OpenSSH,编译的时候会需要 openssl-devel (以下步骤假设你已经安装 openssl-devel):
$ ./configure --prefix=/usr --sysconfdir=/etc/ssh --with-md5-passwords --with-pam你甚至可以不依赖 OpenSSL…… 只需要带上 --without-openssl 即可。
1. 选择桥接网卡可以和宿主机在同一个网段下,NAT 的话要 ssh 只能做端口转发
Licensed under Anti-996 License 1.0
本文链接:https://epliar.com/articles/upgrade-openssh-and-openssl-on-centos-7/